


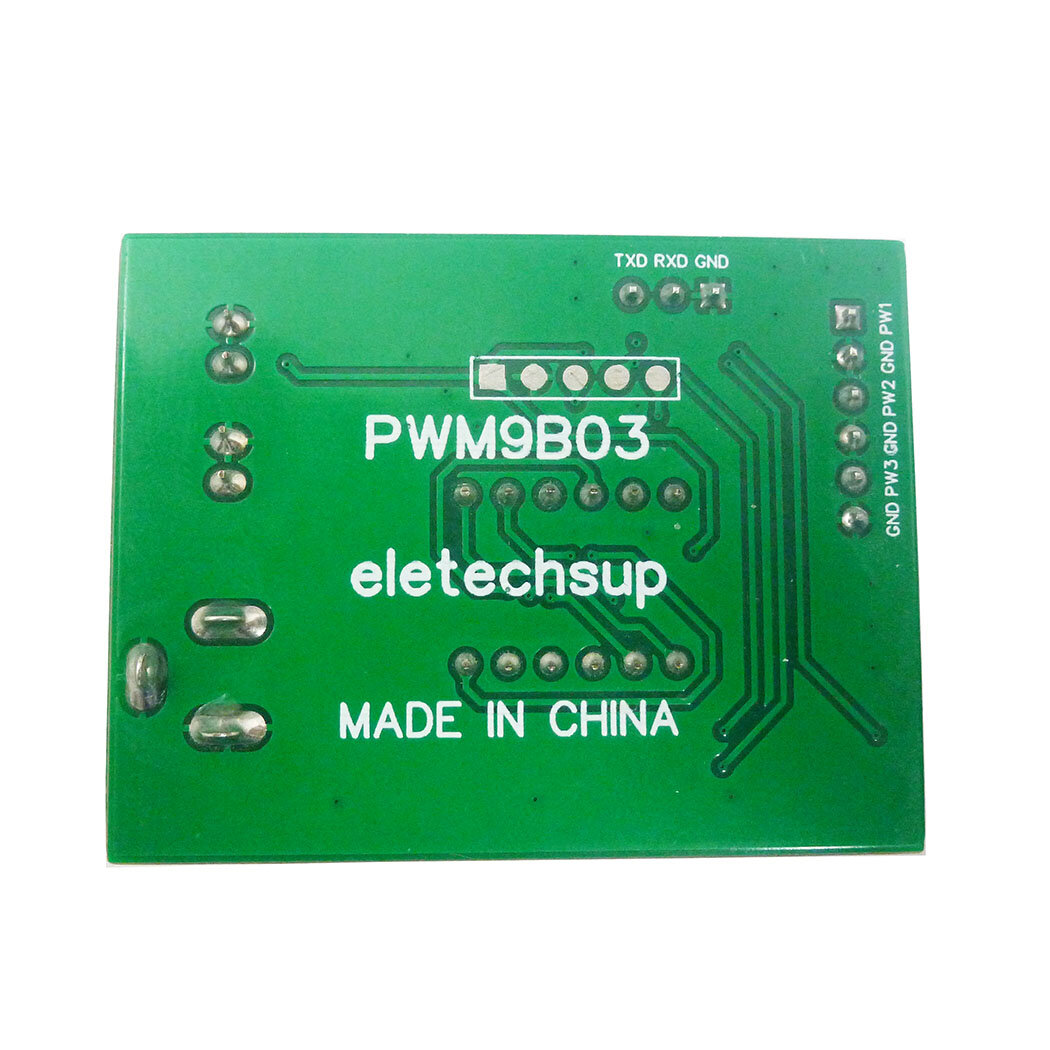

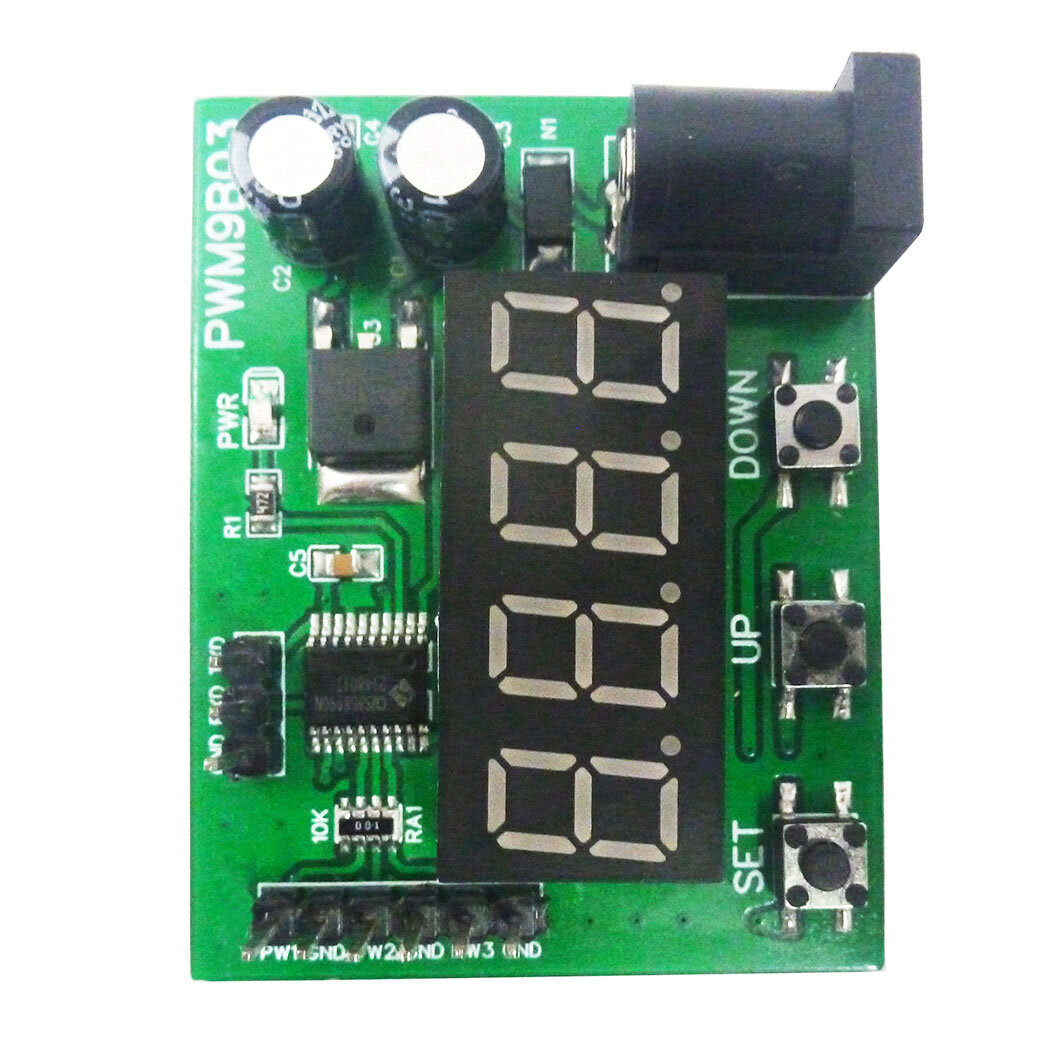
PWM9B03 3-Channel PWM Pulse Signal Generator Module

 Direct purchase from the factory
ធានាសុវត្ថិភាពពេលពិនិត្យចេញ

 អំណោយឥតគិតថ្លៃ
 គោលការណ៍ដឹកជញ្ជូន
 គោលការណ៍ត្រឡប់មកវិញ
អំណោយឥតគិតថ្លៃ
សូមស្វាគមន៍មកកាន់ Roymall គេហទំព័រវិជ្ជាជីវៈរបស់អ្នកសម្រាប់ការទិញអំណោយហាងផ្នែកដ៏ឧត្តុង្គឧត្តម។ យើងពិតជាឲ្យតម្លៃ និងថ្លែងអំណរគុណចំពោះការគាំទ្ររបស់អ្នក ហើយយើងចង់បង្ហាញពីការអរគុណរបស់យើងដោយបន្ថែមភាពរំភើបបន្ថែមទៅការទិញរបស់អ្នក។ នៅពេលអ្នកទិញជាមួយយើង អ្នកមិនត្រឹមតែរីករាយជាមួយនឹងផលិតផលដែលមានគុណភាពខ្ពស់ដែលធ្វើឱ្យជីវិតរបស់អ្នកប្រសើរឡើងប៉ុណ្ណោះទេ ប៉ុន្តែអ្នកក៏នឹងទទួលបានអំណោយឥតគិតថ្លៃដែលមានតែមួយគត់ជាមួយនឹងគ្រប់ការបញ្ជាទិញរបស់អ្នក។ ត្រៀមខ្លួនរួចរាល់ដើម្បីស្វែងយល់ពីការប្រមូលរបស់យើង និងស្វែងរកអំណោយដ៏ល្អឥតខ្ចោះរបស់អ្នក? រាវរកការជ្រើសរើសផលិតផលហាងផ្នែកដ៏ឧត្តុង្គឧត្តមរបស់យើង ដាក់ការបញ្ជាទិញរបស់អ្នក និងរង់ចាំភាពរំភើបនៃអំណោយឥតគិតថ្លៃរបស់អ្នកដែលមកជាមួយនឹងការទិញរបស់អ្នក។គោលការណ៍ដឹកជញ្ជូន
យើងនឹងខិតខំប្រឹងប្រែងដើម្បីដឹកជញ្ជូនធាតុទៅអ្នកបន្ទាប់ពីទទួលបានការបញ្ជាទិញរបស់អ្នក និងធានាថាពួកគេមកដល់ដោយសុវត្ថិភាព។ ព័ត៌មានលម្អិតអំពីការដឹកជញ្ជូននឹងត្រូវបានផ្តល់ឱ្យក្នុងអ៊ីមែលបញ្ជាក់របស់អ្នក។ក្នុងករណីភាគច្រើន ការបញ្ជាទិញត្រូវបានដំណើរការក្នុងរយៈពេល 2 ថ្ងៃ។ក្រោមស្ថានភាពពិសេស វានឹងត្រូវពន្យារពេលដូចខាងក្រោម៖ នៅពេលអ្នកដាក់ការបញ្ជាទិញនៅថ្ងៃសៅរ៍ ថ្ងៃអាទិត្យ ឬថ្ងៃឈប់សម្រាកសាធារណៈ វានឹងត្រូវពន្យារពេល 2 ថ្ងៃ។ជាធម្មតា វាត្រូវការពេលវេលា 5-7 ថ្ងៃធ្វើការ (ច័ន្ទដល់សុក្រ) ដោយមិនរងផលប៉ះពាល់ពីការពន្យារពេលជើងហោះហើរ ឬកត្តាបរិស្ថានផ្សេងទៀត។ដោយសារសេវាកម្មដឹកជញ្ជូនរបស់យើងគឺជាសកល ហេតុនេះពេលវេលាដឹកជញ្ជូននឹងអាស្រ័យលើទីតាំងរបស់អ្នក ដូច្នេះវាអាចត្រូវការពេលវេលាមួយចំនួន ហើយសូមរង់ចាំដោយសេចក្តីអត់ធ្មត់ ប្រសិនបើអ្នកស្ថិតនៅក្នុងស្រុក ឬប្រទេសដាច់ស្រយាល។1. គោលការណ៍ត្រឡប់មកវិញ & ផ្លាស់ប្តូរ
យើងទទួលយកតែធាតុដែលបានទិញពី roymall.com។ ប្រសិនបើអ្នកទិញពីអ្នកចែកចាយក្នុងស្រុករបស់យើង ឬអ្នកលក់រាយផ្សេងទៀត អ្នកមិនអាចត្រឡប់វាមកយើងវិញបានទេ។ ធាតុលក់ចុងក្រោយ ឬអំណោយឥតគិតថ្លៃមិនអាចទទួលយកសម្រាប់ការត្រឡប់មកវិញបានទេ។ដើម្បីមានសិទ្ធិទទួលបានការត្រឡប់មកវិញ ធាតុរបស់អ្នកត្រូវតែមិនបានប្រើប្រាស់ ហើយនៅក្នុងស្ថានភាពដូចគ្នានឹងពេលអ្នកទទួលបានវា។ វាត្រូវតែនៅក្នុងកញ្ចប់ដើមផងដែរ។បន្ទាប់ពីទទួលបានការណែនាំអំពីការត្រឡប់មកវិញពីយើង សូមវេចខ្ចប់ធាតុដែលអ្នកបានត្រឡប់មកវិញ ហើយទម្លាក់កញ្ចប់របស់អ្នកនៅក្នុងការិយាល័យប្រៃសណីយ៍ក្នុងស្រុក ឬអ្នកដឹកជញ្ជូនផ្សេងទៀត។យើងនឹងដំណើរការធាតុត្រឡប់មកវិញ ឬផ្លាស់ប្តូររបស់អ្នកក្នុងរយៈពេល 3-5 ថ្ងៃធ្វើការបន្ទាប់ពីយើងទទួលបានវា។ ការបង្វិលសាច់ប្រាក់នឹងត្រូវបានដំណើរការ និងផ្ទេរទៅក្នុងវិធីសាច់ប្រាក់ដើមរបស់អ្នកដោយស្វ័យប្រវត្តិ។មិនអាចទទួលយកការត្រឡប់មកវិញ ឬផ្លាស់ប្តូរបានទេ ប្រសិនបើផលិតផលត្រូវបានផលិតតាមការកំណត់ រួមទាំងទំហំតាមការកំណត់ ពណ៌តាមការកំណត់ ឬបោះពុម្ពតាមការកំណត់។ត្រូវការជំនួយបន្ថែម សូមទាក់ទងមកយើងខ្ញុំ។ service@roymall.com ឬ Whatsapp: +8619359849471
2. គោលការណ៍បង្វិលសាច់ប្រាក់
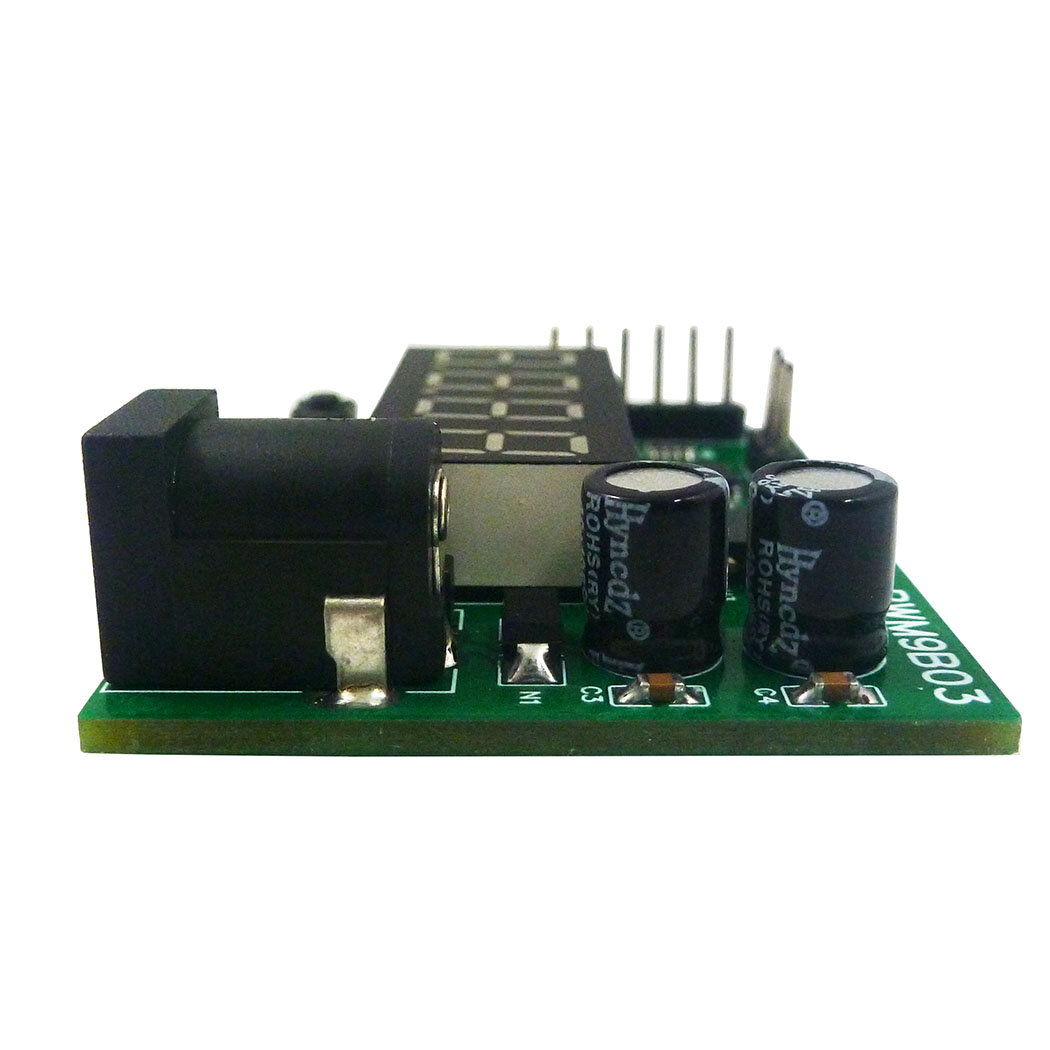
អ្នកនឹងទទួលបានការបង្វិលសាច់ប្រាក់ពេញលេញ ឬ 100% ឥណទានហាងបន្ទាប់ពីយើងទទួលបាន និងពិនិត្យមើលកញ្ចប់ដែលបានត្រឡប់មកវិញ។ ការបង្វិលសាច់ប្រាក់នឹងត្រូវបានដំណើរការ និងផ្ទេរទៅក្នុងវិធីសាច់ប្រាក់ដើមរបស់អ្នកដោយស្វ័យប្រវត្តិ។សូមចំណាំថាថ្លៃដឹកជញ្ជូន និងការបង់ប្រាក់ឬថ្លៃសេវាណាមួយមិនអាចបង្វិលបានទេ។ ថ្លៃដឹកជញ្ជូនបន្ថែមមិនអាចបង្វិលបានទេ នៅពេលដែលកញ្ចប់ត្រូវបានដឹកជញ្ជូន។ អ្នកគឺជាអ្នកទទួលខុសត្រូវក្នុងការបង់ថ្លៃសេវាទាំងនេះ ហើយយើងមិនអាចលើកលែង ឬបង្វិលវាបានទេ ទោះបីជាការបញ្ជាទិញត្រូវបានត្រឡប់មកយើងវិញក៏ដោយ។នៅពេលដែលយើងបានទទួល និងបញ្ជាក់អំពីធាតុដែលបានត្រឡប់មកវិញរបស់អ្នក យើងនឹងផ្ញើអ៊ីមែលមួយទៅអ្នក ដើម្បីជូនដំណឹងថា យើងបានទទួលធាតុដែលបានត្រឡប់មកវិញរបស់អ្នក។ យើងក៏នឹងជូនដំណឹងដល់អ្នកអំពីការអនុម័ត ឬការបដិសេធនៃការបង្វិលសាច់ប្រាក់របស់អ្នកផងដែរ។ប្រសិនបើអ្នកមានបញ្ហាណាមួយទាក់ទងនឹងដំណើរការបង្វិលសាច់ប្រាក់ សូមទាក់ទងមកយើងខ្ញុំ។ service@roymall.com ឬ Whatsapp: +86193598494711 Working voltage: DC 6-24V
2 Working current: DC 12-30MA
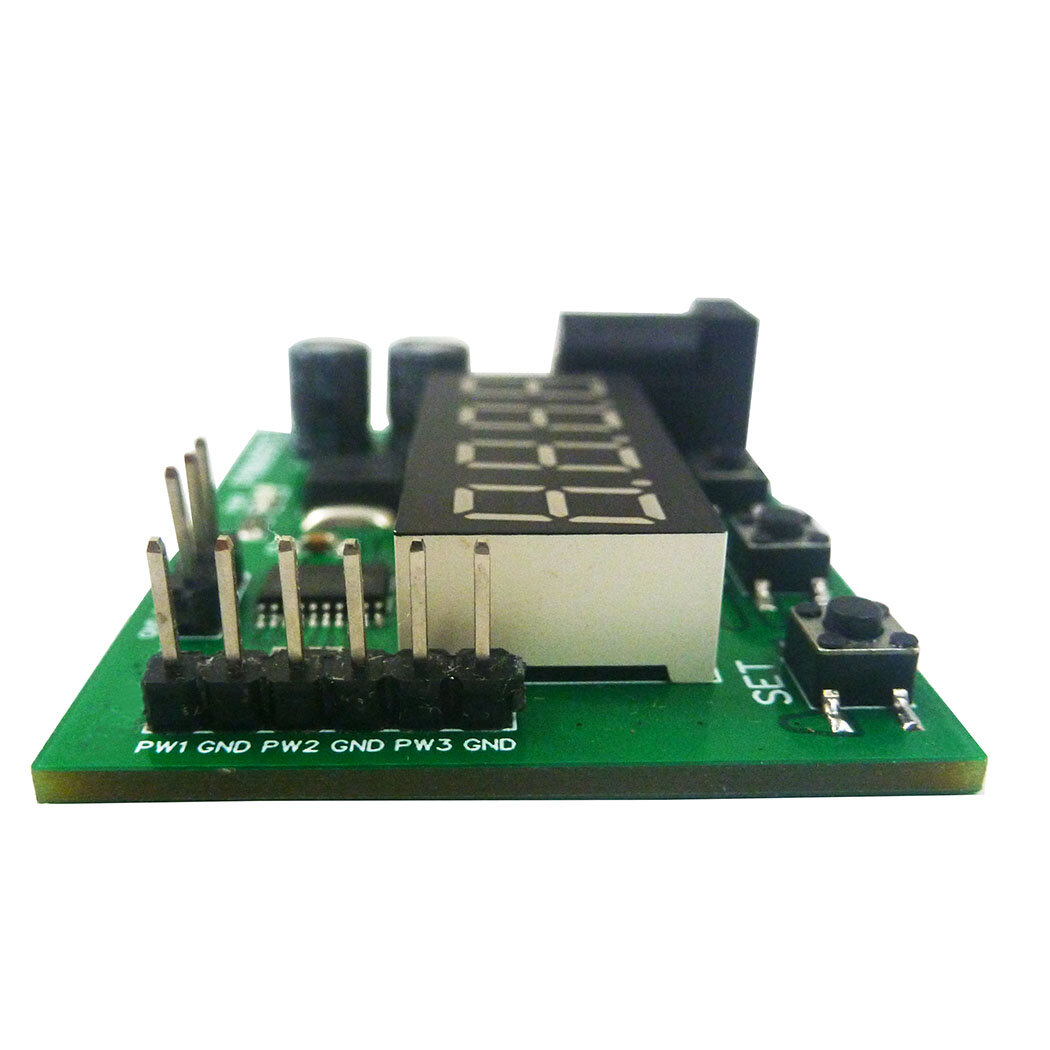
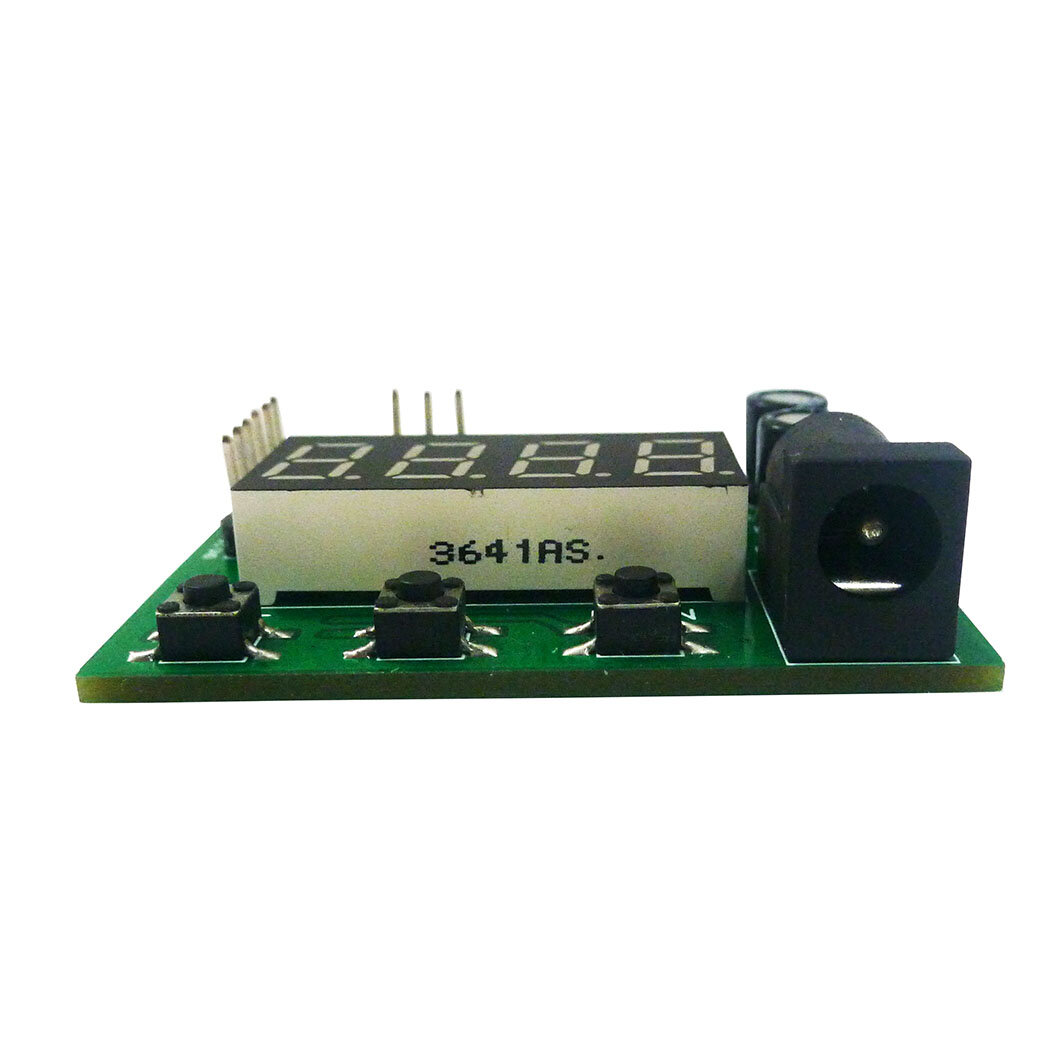
3 3 independent buttons: used to set frequency, duty cycle, working status, etc.;Support long press, short press, simple operation and diverse functions.
4 3 Channels PWM output: PWM Signal can set frequency and duty cycle respectively.
5 PWM signal level: 5V TTL level
6 PWM signal load capacity: <20mA
7 Output frequency accuracy: 0.6% (10-30 Degrees Celsius)
8 Ultra-high frequency range: 20HZ ~ 1MHZ, duty cycle 0-100%.
9. Power-off memory function: power off at any time, the last set data will be recorded and saved when power off, and the data will be displayed when power is turned on again.
10 Automatic exit function: If there is no operation for 36 seconds, the last set data will be automatically recorded, and the dynamic setting state will be exited.
11. Real-time update function: Under the dynamic setting function, you can connect an oscilloscope to grasp the set frequency and duty cycle at any time, and output the precise frequency or duty cycle.
12. Restore production setting function: in dynamic setting mode, press and hold the UP and DOWN buttons at the same time to restore the production setting (after pressing, you need to power off and power on again, the data will be updated to the default data)
13 kinds of application scenarios: The module has a variety of control methods and working modes, and three output channels, which can meet the requirements of different environments.
14 Dimensions: 49 x 38 x 13mm
15 Weight: 14.5g
PWM signal parameter description:
1 PWM frequency: the setting range is 20HZ ~ 1MHZ. The default value is 100HZ.
Four-digit digital tube, the decimal determines the unit of frequency. When there is a decimal point, the unit is KHZ, and when there is no decimal point, the unit is HZ.
The relationship between the digital tube display number and the output frequency:
0034: Indicates that the frequency is 34HZ
0234: Indicates the frequency is 234HZ
1234: Indicates the frequency is 1234HZ
1.234 : indicates that the frequency is 1.234KHZ
12.34 : indicates that the frequency is 12.34KHZ
123.4: Indicates the frequency is 123.4KHZ
0.123: Indicates that the frequency is 0.123KHZ (that is, 123HZ)
2 PWM duty cycle: setting range 0 ~ 100
0: The corresponding PWM remains low
100: The corresponding PWM remains high
1 ~ 99: corresponding duty cycle 0.01 ~ 0.99
The relationship between the digital tube display number and the output duty cycle
0005: Indicates that the output duty cycle is 0.05/5%
0050: Indicates that the output duty cycle is 0.50/50%
Note: 1. Other combinations are also possible, but whether the data can be more accurate is related to your test tool
Package include:
1u00d7 Module Board
How to set PWM output parameters:
Example 1:
For example, the parameters of the three channels are 100HZ/50%, 200HZ/60%, 300HZ/70%
View the parameters of the three channels:
1 Powered on PWM9B03 module, the PWR indicator is on, and the digital tube is off
2 Click the SET button to display PF1 (for 1 second), and then normally display 0100 (channel 1 frequency 100HZ)
3 Click the SET button twice to display dU1 (for 1 second), and then normally display 0050 (channel 1 duty cycle 50%)
4 Click the SET button three times to display PF2 (for 1 second), and then normally display 0200 (channel 2 frequency 200HZ)
5 Click the SET button four times, display dU2 (for 1 second), and then normally display 0060 (channel 2 duty cycle 60%)
6 Click the SET button five times to display PF3 (for 1 second), and then normally display 0300 (channel 3 frequency 300HZ)
7 Click the SET button six times, display dU3 (for 1 second), and then normally display 0070 (channel 3 duty cycle 70%)
Example 2:
Set channel 1 to: frequency 1000HZ, duty cycle 40%
1 Powered on PWM9B03 module , the PWR indicator is on, and the digital tube is off
2 Press and hold the SET button for 3-5 seconds, first display PF1 (for 1 second), and then flash the number
3 Click the UP/DOWN button to adjust the number to 1000 (frequency 1000HZ)
4 Press and hold the SET button for 3-5 seconds for the second time, first display dU1 (for 1 second), and then flash the number
5 Click the UP/DOWN button to adjust the number to 0040 (40% duty cycle)
6 Re-power
Example 3:
Set channel 3 to: frequency 10.12KHZ, duty cycle 60%
1 Powered on PWM9B03 module, the PWR indicator is on, and the digital tube is off
2 Press and hold the SET button for 3-5 seconds, first display PF1 (for 1 second), and then flash the number
3 Press and hold the SET button twice for 3-5 seconds, first display dU1 (for 1 second), and then flash the number
4 Press and hold the SET button three times for 3-5 seconds, PF2 will be displayed first (for 1 second), and then the number will flash.
5 Press and hold the SET button four times for 3-5 seconds, first display dU2 (for 1 second), and then flash the number
6 Press and hold the SET button five times for 3-5 seconds, first display PF3 (for 1 second), and then flash the number
7 Click the UP/DOWN button to adjust the number to 1012, and then click the SET button to adjust the number to 10.12 (frequency 10.12KHZ)
8 Press and hold the SET button for 3-5 seconds for six times, first display dU3 (for 1 second), and then flash the number
9 Click the UP/DOWN button to adjust the number to 0060 (60% duty cycle)
10 Re-power
Example 4:
Factory Reset
1 Powered on PWM9B03 module, the PWR indicator is on, and the digital tube is off
2 Press and hold the SET button for 3-5 seconds, first display PF1 (for 1 second), and then flash the number
3 Press the UP and DOWN buttons at the same time to restore the factory settings
4 Re-power


